Elden Ring: How To Increase Equip Load [Explained]
[ad_1]
Elden Ring has tons of stats that players can level up and grind for to increase them, one of which is the Equip Load stat. While playing the game, players might face difficulty having a lesser Equip Load. Therefore, they might need assistance knowing Elden Ring How To Increase Equip Load!
Key Highlights
- Equip Load determines how well players can move and governs their overall mobility.
- Maximum Equip Load will be directly related and impacted by Endurance and depends on whether players increase it.
- Three talismans can help players boost their equip Load, which will be the Great-Jar’s Arsenal Talisman, Arsenal Charm, and Erdtree’s Favor!
- Players can find different variations of these talismans and have their equipment load boosted according to that.
- Having too high Equip Load will also negatively impact the player’s gameplay experience, making moving and mobility difficulties.
There are three main ways that players will be able to have their overall equip Load increased, which will be determined by a few pieces of equipment as well as some talismans that players will need to get their hands on, which will essentially boost up their Equip Load in one way or another.
Great-Jar’s Arsenal Talisman
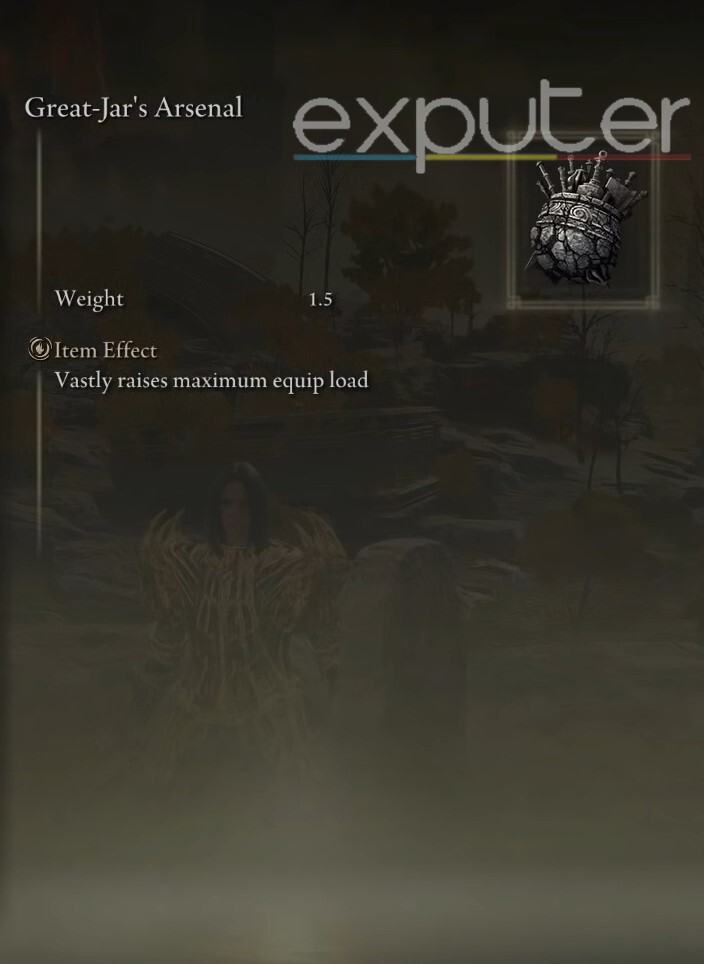
One of the biggest ways to know Elden Ring How To Increase Equip Load will be by getting your hands on the Great Jar’s Arsenal.
- The Great Jar’s Arsenal is a talisman, and talismans are considered accessories that offer various stat boosts and effects. Talismans can be encountered in chests, looting from corpses, and they can also be awarded to players if they defeat a tough boss.
- Now, when it comes to the Great Jar’s talisman, it will have its main aim is to be equipped by the player so that it can increase the overall max Equip Load by 19%, which will incredibly boost up the equip Load.
- The talisman is described as a charm resemblant to a jar filled to the brim with nothing but weapons, and it is also described to be handed out to only the strongest of warriors so that they can grow stronger.
Talisman Location
Now, let’s discuss a little bit how players might be able to encounter and find the talisman itself. To even get the talisman, players will need two Stonesword keys that are stone keys that are shaped like swords and are known to break down the seals on statues that are important, but they will continue to remain embedded in the statue after it has been used.
- These keys will be used to get to an elevator that will then be used to make your way over to the next location.
- Players want to start by being at the Third Church of Marika grace area, and the reason for choosing that place is simply because it is a safe route to traverse through.
If you open up the map and see the area, players will take note of a route heading down from the grace site. It will be a safer area, and players will be able to go through it without much difficulty. They will need to get near the Siofra River Well area.
Once you do head into the building, there will be an elevator that players will be able to take, which will take them down, and into an underground area, from where they want to take their horse or go by foot towards another elevator and then towards the grace that is present towards the left of the map.
- Once you get close to the site of grace near the Siofra River Bank, you will be in a puddle of water, from where you will want to hop on a horse. Once you do so, start heading straight through the water until you’re able to make your way to the shore, and a blue beam will shine towards the grassy patch.
- The beam will be present towards a set of stairs that will lead up to a building, and it will be located towards the two stone pillars that will be placed on either corner of the stairs.
- When you take the map, you want to continue heading down the main path until you can come across the Below The Well site of grace.
From here, you will be able to take note of a small jump you will have to make to reach the ground, and from there, players will be able to take note of the stairs far off in the distance.
- Get on a horse, start heading up the stairs, and right on top, there will be a statue where players can use their stone sword keys. It will reveal the elevator you can take up, then take you over to the Deep Siofra Well area.
From there, start heading down the main area, and you will encounter a large enemy you will have to defeat. Head over to the place where there is a giant jar, and you are being told that you can now see the Knight of The Great Jar’s red summons ign.
- The will be three knights that players will be able to summon, and you will need to defeat them, either all together or you can go for kill one by one.
The fight can quite literally be cheesed by hanging out at the edge of a cliff and simply letting the knights fall to their death. After that, you can talk to the jar again, granting you your Great Jar’s Arsenal Talisman.
Arsenal Charm Talisman
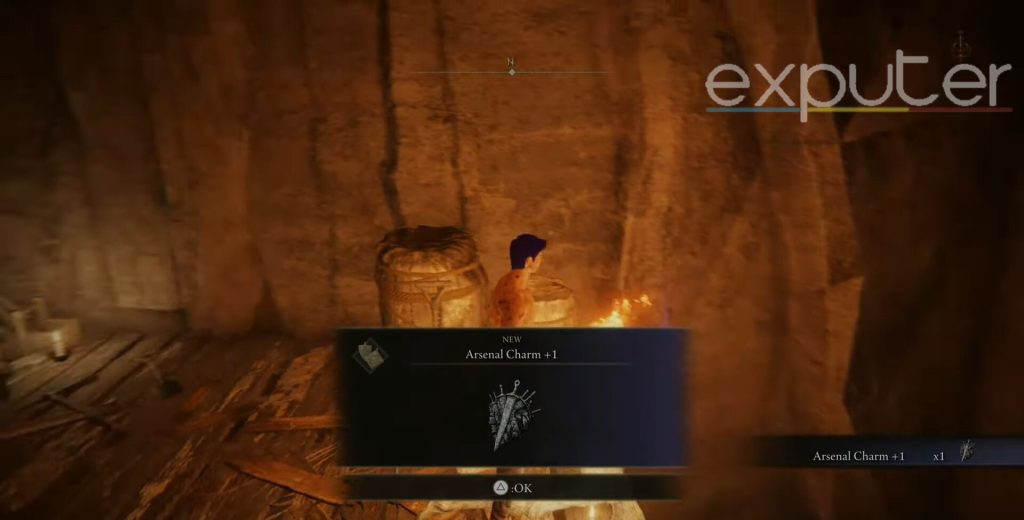
Another way that players will be able to know Elden Ring How To Increase Equip Load will be by using the arsenal charm talisman, which is described to be an iron charm that will be resemblant of a small charm that will have a sword plowing down the middle of it. There will be smaller weapons on either side of it.
- The talisman is known to be sourced from a random greatsword that used to be equipped by a warrior that would continue to seek vengeance by any means necessary.
- There will be two types of charms that players will be able to sue, one of which will be the normal talisman, and whenever players can equip it, they will be able to have their Equip Load increased by 15%,
- The second type of talisman that players can get their hands on will be able to boost up their overall Equip Load by 17%, which will be the +1 version.
15% Talisman Location
In order to get the talisman that boosts up your Equip Load by 15%, players will first need to start by opening up their map, and they will need to make their way over to a site of grace that will be present in the Secluded Cell area.
- From there, they will be a room that players will need to head out of, from where they will need to make a sharp right turn, and after that, they will then have to get out of another room. From there, players will need to go out of the cell and then take a left turn.
- After that, players will encounter a giant that will be ready to attack them, and if players are not in the mood to speedrun, then they can kill off the giant, or you can head past it, where there will also be a smaller enemy that you will have to defeat, and then continue making your way down the stairs.
- There will be a room that will be surrounded on the outside will a lot of barrels, and if you end up heading down the entrance of the room, which stairs will indicate, you will find yourself to be in a room that will have barrels inside as well, and they will be lined along the walls.
There will be an entity you can interact with, and players should keep in mind that you will have to talk to her before you have defeated Godrick.
- Once you start the interaction, she will talk about Godrick, and you want to continue having the conversation until you can convince her to help you get rid of Godrick.
- Go back to the boss fog area, there will be an option to summon the Nepheli Loux, and it will show a box that will say that it is summoning the cooperator, and from there, you will need to defeat Godrick.
After you have managed to defeat it, go back to the roundtable, and here you will need to find Nepheli, and she will then mention the battle you just had against Godrick. And she will then simply hand over the Arsenal Charm to you.
Arsenal Charm +1 Location
Moving on, let’s see how you will be able to find the second arsenal charm, which will further assist the player in figuring out Elden Ring How To Increase Equip Load, which is automatically supposed to be able to give you an overall boost in your Equip Load by 17%.
- The charm can be found by going over to the Altus Tunnel, an area that players can encounter whenever they are traversing along the Altus Plateau area.
- There will be a minor erdtree that can be come across when you’re traveling in the southern area of the Altus Plateau.
Once there, head into a small entrance that players can find in the middle of the mountain, which will resemble a mining area.
- Once inside, go further until you can get on an elevator which will eventually start heading down. You can head inside the Altus tunnel further, which will make you encounter a few enemies in the rooms that you can defeat, and there will be extra loot that you can get as well.
- Keep heading deeper into the Altus tunnel until you can come back outside towards another mining area with a balcony overlooking an edge. Players looking down from the edge of the balcony will see an endless abyss.
- You can also find a few golden runes here, so pick them up while you’re at it. From there, go toward the edge, where payers can see a lower platform that they can jump on, which leads them down to another balcony area where they can safely land.
From there, hop back onto the giant tree trunk you took down, and you will see an enemy in the far distance. It will continue to throw down purple rocks. Go up the tree trunk, and you will be able to encounter a corpse which will then grant you the Arsenal Charm +1 talisman.
Erdtree’s Favor
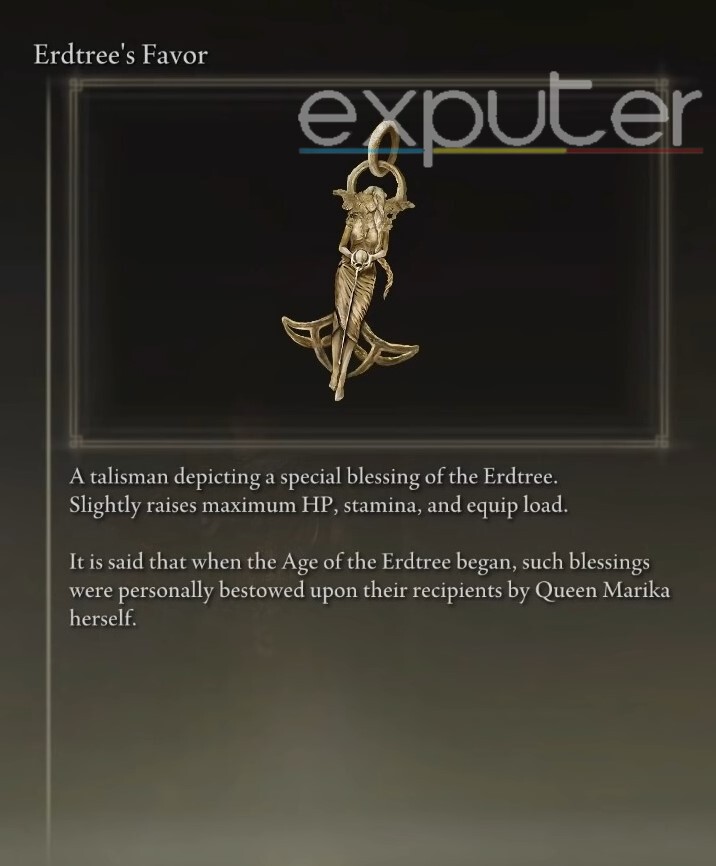
The third talisman that players will be able to use to increase their equips Load will be known as Erdtree’s Favor talisman, which alongside the equip Load, will also give players a boost in their overall HP, as well as stamina.
- There will be three variations for the talisman, one of which will increase Equip Load by 5% while also giving a stamina boost of 6.75% and increasing the overall max HP by 3%.
- The second variation for the talisman will be able to grant an increase in the Equip Load by 6.5% while also increasing the overall HP by 3.5% and stamina by 8.25%.
- The final variation will increase the Equip Load by 8%, HP by 4%, and stamina by 9.6%.
Talisman Location
One of the main ways that players will be able to get the Erdtree’s Favor talisman s by returning to a location that was present when the players first started playing the game.
- There will be an area called the Stormhill Shack, and you will need to go to the site of grace that is present there.
When you first make your way over to the shack, there will be an area where you can jump onto a few platforms made of wood, and on the third platform, there will be a purple beam that you can interact with, which will say that it is a “pillage remains” from where you will be able to get a stone sword key.
- The next stone sword will be present in the area of the Dragon Burnt Ruins. When you’re in ruins, there will be a room you can go in, which will be filled with water, and towards the right corner of the room, there will be a stone sword key that you can pick up.
- From there, head to the site of grace that is present at the Stranded Graveyard, and there will be poison damage that the payer will be able to take; therefore, immunity armor will be necessary here. Head down into the puddle of poison, run through it, and get to safety.
Go deeper into the Fringefolk Hero’s Grave area, and there will be a giant cart that will practically be ready to slice you; therefore, players need to take shelter towards one of the dips in the wall that they can find. Run towards one of the right dips, allowing you to jump further down.
- From here, drop down when you reach a bridge that has the right edge exposed and run through the tunnels until you get out and find a bridge, and towards the end of the bridge, you will have to defeat an enemy, but you will also get the Erdtree’s Favor talisman.
As for the +1 variation, players can find it in the area of the Subterranean ground, while the +2 variant can be encountered in the Leyndell Ashen Capital area.
Endurance
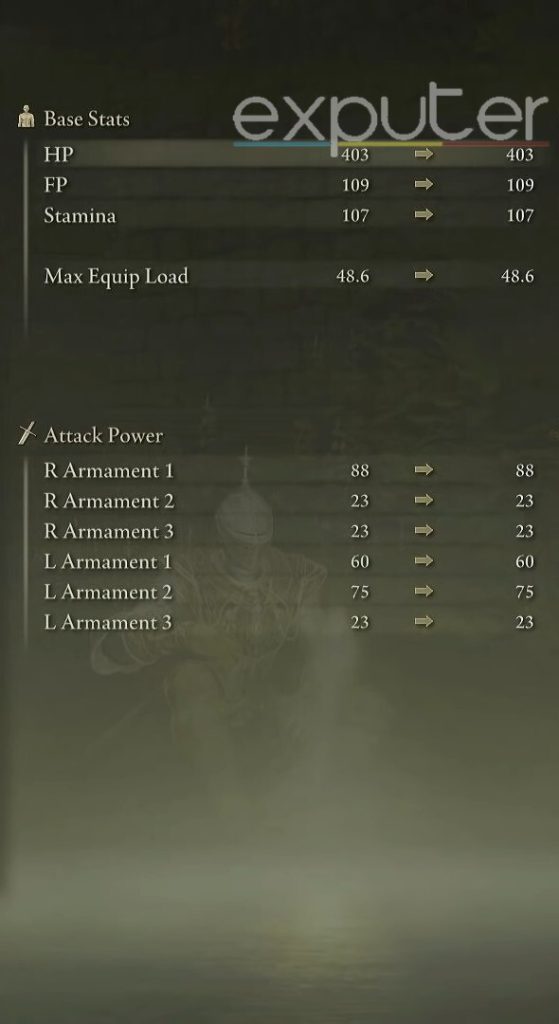
Equip Load itself is known to be a stat that will determine the way players are able to move around, meaning that if Equip Load gets way too much, then there is a high chance that the player’s mobility will end up being negatively impacted, which can slow down your overall progression and movement as well Endurance will play a major part in determining Elden Ring How To Increase Equip Load.
The equipment load will be based on your:
- Armaments will basically talk about the weapons that players are able to equip, and the more weapons that the players have equipped onto them, or the more armaments that have been added to inventory, it will then immediately start affecting your overall equipment load.
- Another way that players will have their equipment load affected will be by the armor being worn by players. If there is any armor that is on the heavier side, then it will automatically mean that your Equip Load will be negatively impacted, and armor, in general, can be one of the biggest contributors to equip Load.
- Talismans can also further contribute to the player finding out Elden Ring How To Increase Equip Load, and while talismans may not add a lot, they still do, nonetheless.
Now, when it comes to Endurance, the Equip Load will directly be affected by the player’s Endurance as well. The more the player adds points into Endurance, the more the overall max equip Load can be increased.
- Endurance will basically be used to govern the way players have their overall stamina, alongside also governing robustness while also being able to govern the player’s max equip Load.
By leveling up Endurance, players will be able to see their maximum Equip Loadbe boosted up as well. Ranging from level 1 to level 99, players will be able to see an increase in their Equip Loadas suggested following:
| Endurance Level | Endurance Points | Increased By |
| 1 | 45 | 0 |
| 2 | 45 | 0 |
| 3 | 45 | 0 |
| 4 | 45 | 0 |
| 5 | 45 | 0 |
| 6 | 45 | 0 |
| 7 | 45 | 0 |
| 8 | 45 | 0 |
| 9 | 46.6 | 1.6 |
| 10 | 48.2 | 1.6 |
| 11 | 49.8 | 1.6 |
| 12 | 51.4 | 1.6 |
| 13 | 52.9 | 1.5 |
| 14 | 54.5 | 1.6 |
| 15 | 56.1 | 1.6 |
| 16 | 57.7 | 1.6 |
| 17 | 59.3 | 1.6 |
| 18 | 60.9 | 1.6 |
| 19 | 62.5 | 1.6 |
| 20 | 64.1 | 1.6 |
| 21 | 65.6 | 1.5 |
| 22 | 67.2 | 1.6 |
| 23 | 68.8 | 1.6 |
| 24 | 70.4 | 1.6 |
| 25 | 72 | 1.6 |
| 26 | 73.0 | 1.0 |
| 27 | 74.1 | 1.1 |
| 28 | 75.2 | 1.1 |
| 29 | 76.4 | 1.2 |
| 30 | 77.6 | 1.2 |
| 31 | 78.9 | 1.3 |
| 32 | 80.2 | 1.3 |
| 33 | 81.5 | 1.3 |
| 34 | 82.8 | 1.3 |
| 35 | 84.1 | 1.3 |
| 36 | 85.4 | 1.3 |
| 37 | 86.8 | 1.4 |
| 38 | 88.1 | 1.3 |
| 39 | 89.5 | 1.4 |
| 40 | 90.9 | 1.4 |
| 41 | 92/3 | 1.4 |
| 42 | 93.7 | 1.4 |
| 43 | 95.1 | 1.4 |
| 44 | 96.5 | 1.4 |
| 45 | 97.9 | 1.4 |
| 46 | 99.4 | 1.5 |
| 47 | 100.8 | 1.4 |
| 48 | 102.2 | 1.4 |
| 49 | 103.7 | 1.5 |
| 50 | 105.2 | 1.5 |
| 51 | 106.6 | 1.4 |
| 52 | 108.1 | 1.5 |
| 53 | 109.6 | 1.5 |
| 54 | 111.0 | 1.4 |
| 55 | 112.5 | 1.5 |
| 56 | 114.0 | 1.5 |
| 57 | 115.5 | 1.5 |
| 58 | 117.0 | 1.5 |
| 59 | 118.5 | 1.5 |
| 60 | 120.0 | 1.5 |
| 61 | 121 | 1.0 |
| 62 | 122.1 | 1.1 |
| 63 | 123.1 | 1.0 |
| 64 | 124.1 | 1.0 |
| 65 | 125.1 | 1.0 |
| 66 | 126.2 | 1.1 |
| 67 | 127.2 | 1.0 |
| 68 | 128.2 | 1.0 |
| 69 | 129.2 | 1.0 |
| 70 | 130.3 | 1.1 |
| 71 | 131.3 | 1.0 |
| 72 | 132.3 | 1.0 |
| 73 | 133.3 | 1.0 |
| 74 | 134.4 | 1.1 |
| 75 | 135.4 | 1.0 |
| 76 | 136.4 | 1.0 |
| 77 | 137.4 | 1.0 |
| 78 | 138.5 | 1.1 |
| 79 | 139.5 | 1.0 |
| 80 | 140.5 | 1.0 |
| 81 | 141.5 | 1.0 |
| 82 | 142.6 | 1.1 |
| 83 | 143.6 | 1.0 |
| 84 | 144.6 | 1.0 |
| 85 | 145.6 | 1.0 |
| 86 | 146.7 | 1.1 |
| 87 | 147.7 | 1.0 |
| 88 | 148.7 | 1.0 |
| 89 | 149.7 | 1.0 |
| 90 | 150.8 | 1.1 |
| 91 | 151.8 | 1.0 |
| 92 | 152.8 | 1.0 |
| 93 | 153.8 | 1.0 |
| 94 | 154.9 | 1.1 |
| 95 | 155.9 | 1.0 |
| 96 | 156.9 | 1.0 |
| 97 | 157.9 | 1.0 |
| 98 | 159.0 | 1.1 |
| 99 | 160.0 | 1.0 |
Summary
There we have it! The main ways that players can increase their equip Load, while also knowing how Endurance directly correlates with Equip load, and with that, we will wrap up our Elden Ring How To Increase Equip Load guide!
If you are just starting out in Elden Ring, then you might want to read up on our Elden Ring Best Starting Class which will help carry you through the start of the game and help bring you to mid-game as well!
Up Next:
Was this article helpful?
Thanks! Do share your feedback with us. ⚡
How could we improve this post? Please Help us. ✍
[ad_2]

